

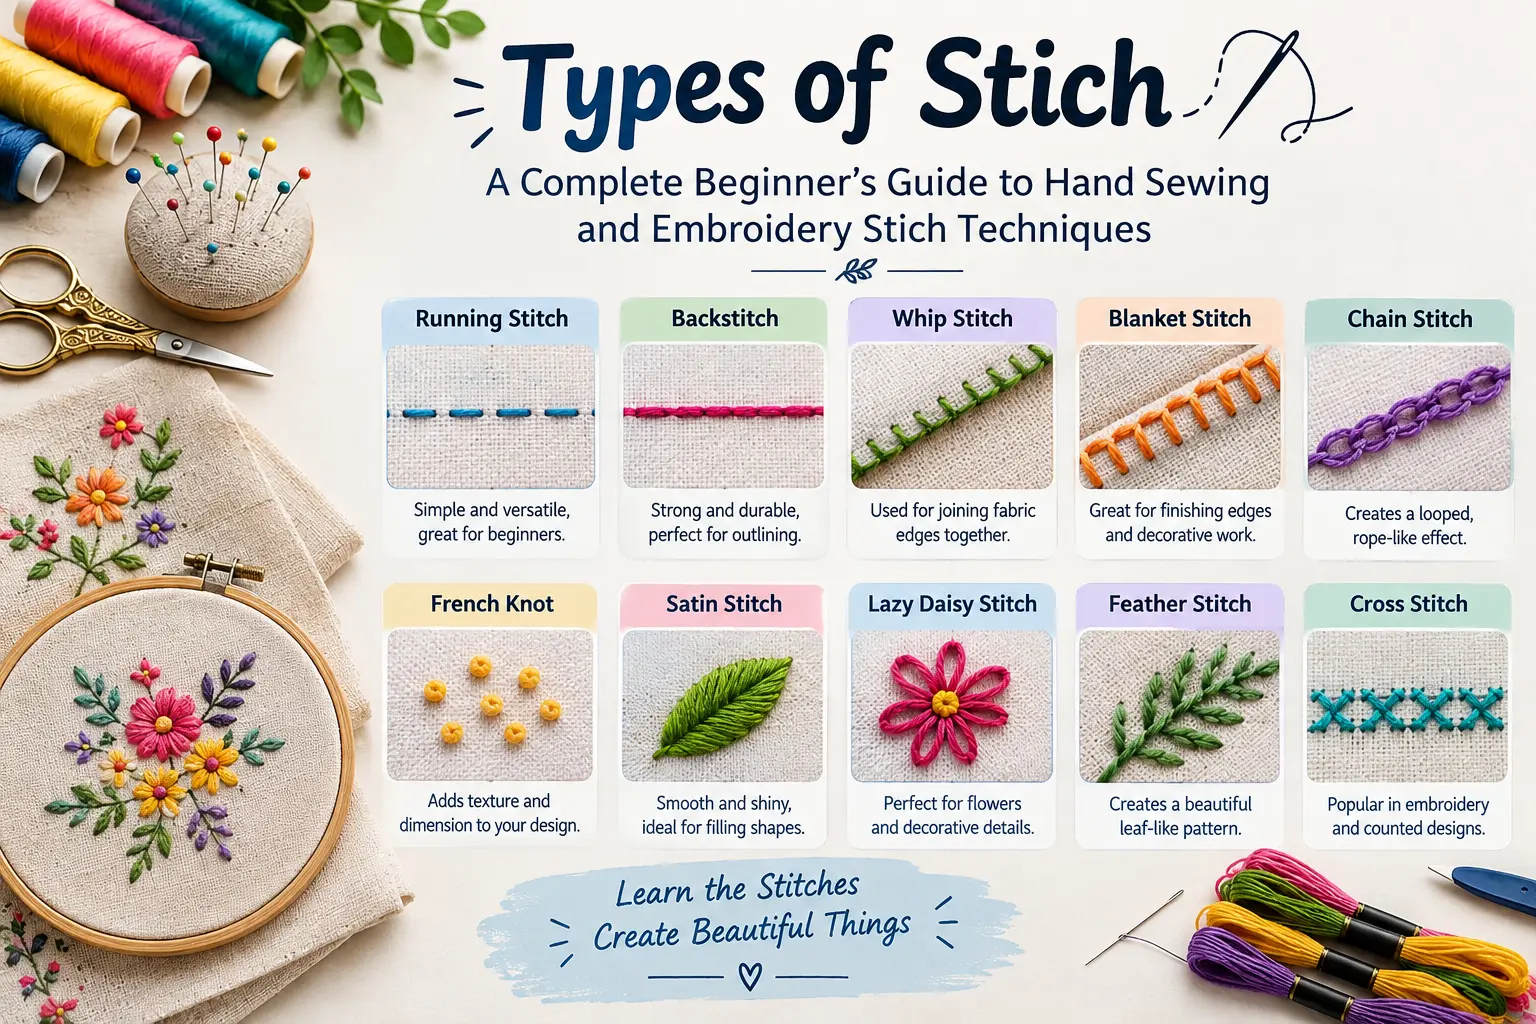
Introduction: Why Learning Stitches Changes Everything
Every handmade garment, mended seam, embroidered cushion and quilted blanket starts with one tiny action: a needle carrying thread through fabric. Yet that one action has dozens of variations, and knowing the main types of stich is what separates frustrating projects from satisfying ones. Many beginners type “stich” into a search bar hoping to find a quick answer, then land on confusing diagrams that assume they already know the basics. This guide fixes that.
Here you will find a plain-language tour of hand sewing stich, popular embroidery stich, and a few machine stich options, each explained with what it looks like, what it is best used for, and how to make it. Whether you want to sew on a button, hem trousers, repair a seam or decorate a tote bag, the basic stich for beginners covered below will give you a solid foundation.
What Is a Stich? Understanding the Basics
A stitch is a single loop or pass of thread through material that either joins pieces together, finishes an edge, or decorates a surface. Thread goes in on one side of the fabric and comes out on the other. Where it goes in, how far it travels, and how it connects to the previous pass determine the stitch type.
The Anatomy of a Stitch
Every stitch has a few parts worth knowing:
- Stitch length: the distance the thread travels on the surface of the fabric. Short stitches are strong and neat; long stitches are fast and temporary.
- Stitch width: how far a stitch spreads sideways, important in decorative and zigzag work.
- Entry and exit points: where the needle enters and leaves the fabric. Consistent spacing makes a professional-looking line.
- Tension: how tightly the thread is pulled. Too tight causes puckers; too loose leaves gaps and sagging.
- Direction: whether you work right to left, left to right, or toward and away from yourself. Most right-handed sewists work right to left.
Functional Versus Decorative Stitches
Almost all sewing stitches fall into two groups. Functional stitches hold fabric together or finish it, such as the backstitch used in seams or the whipstitch used to close an opening. Decorative stitches add texture and pattern, such as satin stitch in embroidery or feather stitch along a quilt seam. Some stitches do both, like the blanket stitch, which protects a raw edge and also looks attractive.
Essential Tools and Materials for Hand Sewing Stich
Good results start with sensible tools. You can build a basic kit for a modest price, and most items last for years.
Needles
Needles come in different lengths, thicknesses and eye sizes, and picking the right one makes any stitch easier.
- Sharps: medium-length needles with round eyes, the all-purpose choice for most hand sewing stitches on woven fabric.
- Betweens (quilting needles): short and sturdy, ideal for making tiny, even stitches through layers.
- Embroidery (crewel) needles: sharp points with long, wide eyes that fit multiple strands of floss.
- Tapestry needles: blunt tips for counted work and for weaving through existing stitches without splitting them.
- Ballpoint needles: rounded tips that slide between the loops of knit fabric instead of piercing them.
As a rule, use the finest needle that still carries your thread comfortably. A needle that is too thick leaves visible holes.
Thread
All-purpose polyester or cotton-wrapped polyester thread suits most garment sewing. Pure cotton thread works well for quilting and natural fabrics. For embroidery, stranded cotton floss is the standard; it is made of six thin strands that you can separate and recombine to change thickness. Buttons and heavy-duty repairs call for stronger thread, sometimes labelled upholstery or button thread. Match thread fiber to fabric when possible, and choose a color slightly darker than the fabric if you cannot find an exact match, because thread looks lighter once stitched.
Other Helpful Supplies
- Sharp fabric scissors, kept only for cloth
- A thimble, to protect your finger when pushing through thick layers
- Straight pins or clips to hold fabric in place
- A tape measure and a fabric marking pen or chalk
- An embroidery hoop for decorative work
- A needle threader if your eyesight or patience demands it
- Beeswax to strengthen thread and reduce tangling
Keep your supplies in a small box so they are ready whenever you need a quick repair. Many people find that the easiest way to stay consistent with sewing stitches is to have the kit visible and accessible.
How to Choose the Right Stich for Your Project
Before you start stitching, ask three questions. First, does the stitch need to be strong, or is it temporary? Second, will it be seen? Third, does the fabric need to stretch? The answers narrow your options quickly.
| Goal | Best stitch choices |
|---|---|
| Temporary hold before final sewing | Basting stitch, tacking stitch |
| Strong seam by hand | Backstitch |
| Quick, light seam or gathering | Running stitch |
| Invisible closure or hem | Slip stitch, ladder stitch, blind hem stitch |
| Joining two edges or attaching a patch | Whipstitch |
| Finishing a raw edge with decoration | Blanket stitch |
| Outlines and curved lines in embroidery | Stem stitch, split stitch, backstitch |
| Filling shapes in embroidery | Satin stitch, long and short stitch |
Fabric matters too. Tightly woven cotton accepts small, precise stitches. Loosely woven linen and open knits need slightly longer stitches and a gentle hand. Slippery fabrics like satin benefit from fine needles and lots of pins. Stretchy fabrics need stitches that can give, such as a loose backstitch, a small zigzag by machine, or a stitch worked with a little slack in the thread.
The Most Important Basic Stich for Beginners
These are the basic stitches for beginners that every sewist should master. Practice each one on a scrap of cotton fabric with contrasting thread so you can see your work clearly.
How to Sew a Stich: Starting and Finishing Your Thread
Before any specific stitch, learn how to start and finish a thread so your work does not unravel.
Starting: Cut a length of thread no longer than your forearm, roughly 18 inches. Longer thread tangles and weakens as it passes repeatedly through fabric. Thread the needle, pull the tail so the two ends are even or slightly uneven, and tie a knot at the end. A simple way to make a knot is to wrap the thread around your index finger, roll it off with your thumb, and pull the loop tight. For a hidden start in a seam, you can instead take a tiny stitch in the seam allowance and make a loop-over to anchor the thread.
Finishing: When you reach the end of a line or run low on thread, take two or three small stitches on top of each other in an inconspicuous spot. Before pulling the last stitch tight, pass the needle through the loop it forms, which creates a secure knot flat against the fabric. Cut the thread, leaving a short tail. This approach to how to sew a stitch from start to finish prevents the heartbreak of a seam coming loose after one wash.
Running Stitch
The running stitch is the simplest of all stitches and the first one most people learn. It is a line of evenly spaced straight stitches with matching gaps in between.
Best for: gathering fabric, light seams, quilting, mending small tears, and decorative lines such as sashiko-style patterns.
How to do it:
- Bring the needle up from the back of the fabric at your starting point.
- Insert it back down a short distance away, about 1/8 to 1/4 inch for fine work.
- Bring the needle up again the same distance ahead, leaving a gap roughly equal to the stitch length.
- Repeat, or load several stitches onto the needle at once before pulling the thread through, which speeds things up.
Tips: Keep stitch length consistent and the thread snug but not tight. A running stitch is not strong enough for stressed seams, so use a backstitch where durability matters. To gather fabric, sew two parallel lines of long running stitches and pull the threads to create even ruffles.
Basting Stitch
A basting stitch, sometimes called a tacking stitch, is a long running stitch, usually a quarter inch or longer, used to temporarily hold layers of fabric together.
Best for: holding seams in place before final sewing, securing zippers, joining quilt layers, and trying on a garment before committing to permanent seams.
How to do it: Work exactly like a running stitch, but make each stitch long, about 1/4 to 1/2 inch. Use a contrasting thread so it is easy to see, and do not knot it too tightly. When you are finished, snip the thread and pull it out. Basting saves time and frustration because fabric no longer slips while you sew.
Backstitch
The backstitch is the strongest of the basic hand stitches. It creates a continuous line that looks similar to machine stitching, which is why it is often used to repair seams.
Best for: strong seams, repairing split seams, attaching pockets or appliqué, outlines in embroidery, and lettering.
How to do it:
- Bring the needle up from the back at point A, about one stitch length from where you want to begin.
- Insert the needle down at the starting point, moving backward.
- Bring the needle up one stitch length ahead of point A.
- Insert the needle down at the end of your previous stitch, moving backward again.
- Continue, always going back to meet the previous stitch.
Tips: Because every stitch overlaps the previous one, the backstitch uses roughly twice the thread of a running stitch. Make stitches small and even for a neat line. A half-backstitch, where you step back only halfway, is a good compromise when you want speed with extra strength.
Slip Stitch
The slip stitch is the go-to for invisible closures. The thread travels inside a folded edge, so only tiny dots show on the surface.
Best for: closing a gap in a stuffed toy or pillow, finishing a lining, hemming, and attaching bias binding.
How to do it:
- Fold under the raw edge and press it flat.
- Hide your knot inside the fold.
- Pick up one or two threads of the flat fabric directly opposite the fold.
- Slide the needle into the fold and move it forward about 1/4 inch inside it, then bring it out.
- Repeat, alternating between the flat fabric and the fold.
Tips: Use thread that matches the fabric. Pull gently so the folded edge meets the flat piece without puckering.
Ladder Stitch
The ladder stitch, also known as the invisible stitch, is closely related to the slip stitch and is excellent for closing seams on stuffed items.
How to do it: With both edges folded inward, bring the needle out of one folded edge, then directly across, insert it into the other folded edge and travel forward. Repeat in a ladder pattern, with the thread forming small horizontal bars across the opening. After several stitches, pull the thread and the opening closes like a zipper. The seam virtually disappears.
Whipstitch
The whipstitch, also called an overcast stitch, wraps around the edges of fabric with small diagonal stitches.
Best for: joining two folded edges, attaching felt pieces, sewing patches, and preventing fraying on raw edges.
How to do it: Hold the two edges together. Insert the needle from the back piece through to the front piece, close to the edge. Pull the thread through, bring it over the edge, and insert it again a little further along. The result is a series of slanted stitches wrapping the seam. Keep stitch spacing even, and use a stitch length of about 1/8 inch for a tidy edge.
Blanket Stitch
The blanket stitch is both functional and decorative. It runs along an edge, with legs of thread hanging off the fabric edge and a connecting line along the border.
Best for: finishing raw fleece or felt edges, blankets, appliqué, and decorative borders.
How to do it:
- Bring the needle up from the back at the edge, about 1/4 inch in from the border.
- Move the needle to the right and insert it from the front a little way back from the edge, then bring it out at the edge with the working thread looped under the needle tip.
- Pull the thread through to form an L-shape along the edge.
- Repeat at even intervals.
Tips: Uniform spacing and uniform stitch height give the stitch a crisp look. For a more decorative edge, vary the stitch heights in a repeating pattern, or use a thicker thread such as pearl cotton.
Blind Hem Stitch
The blind hem stitch is a hem stitch that catches only a thread or two of the outer fabric, so nothing shows on the right side.
How to do it: Fold the hem up and then fold the top edge back toward the fabric by about 1/4 inch, forming a small ledge. Pick up one or two threads from the garment, then slip the needle into the folded hem edge and pull gently. Repeat about 1/2 inch apart. This stitch is ideal for trousers, skirts and curtains.
Catch Stitch
The catch stitch, also called the herringbone hem stitch, works well on stretchy fabrics because the criss-cross thread allows some give.
How to do it: Work from left to right with the needle pointing left. Take a tiny stitch in the garment, then a tiny stitch in the hem a little further to the right, crossing the thread over itself to form small Xs. It is slightly more visible than a blind hem stitch but much more flexible.
Tack and Tailor’s Tack
A tailor’s tack is a loose, looped stitch used to transfer pattern markings onto fabric. Sew a loose stitch through both layers, leaving thread loops, then snip through the loops after separating the layers gently. Little tufts of thread remain on each piece, marking the position without any ink or chalk.
Popular Embroidery Stich to Decorate Fabric
Once you are comfortable with basic hand sewing stitches, the world of embroidery stitches opens up. Embroidery uses many of the same movements as sewing, but with thicker threads, visible patterns and a focus on texture and color. Use an embroidery hoop to keep fabric taut and work with two or three strands of floss for most of the stitches below.
Straight Stitch
The straight stitch is a single stitch worked in any direction and any length. Grouped at different angles, straight stitches create stars, flower petals, grass blades and rays of sun. Bring the needle up at the start, then down at the end. It is as basic as embroidery gets, and it teaches you to control stitch length and direction.
Stem Stitch
The stem stitch gives a rope-like line that curves beautifully, making it the favorite for flower stems, vines and lettering. Work from left to right: bring the needle up, make a stitch forward, and then come back up halfway along the previous stitch, always keeping the thread on the same side of the needle. The overlapping stitches form a slightly twisted line. Keep the thread below the line for a thick appearance or above it for a thinner one.
Split Stitch
The split stitch resembles a fine chain and is useful for outlining and for filling shapes with rows of closely packed lines. Make a straight stitch, then bring the needle up through the middle of that stitch, splitting the strands of thread. Repeat along the line. Use a sharp embroidery needle so you pierce the strands cleanly.
Satin Stitch
Satin stitch fills shapes with smooth parallel stitches that sit snugly side by side, creating a glossy, solid surface. Outline the shape lightly with a split stitch to give a raised edge, then bring the needle up at one edge and down at the opposite edge, working stitch by stitch across the shape. Small areas look best; stitches longer than about half an inch tend to snag, so larger spaces are better filled with long and short stitch.
Chain Stitch
The chain stitch forms a line of linked loops. Bring the needle up, then re-insert it at the same hole, holding a loop of thread on the surface. Bring the needle out a short distance ahead, inside the loop, and pull gently. Repeat, anchoring the last loop with a tiny stitch. Chain stitch makes bold outlines, textured fills, and lettering with a cheerful, folk-art look.
French Knot
The French knot adds tiny raised dots, perfect for flower centers, eyes and textured backgrounds. Bring the needle up, wrap the thread around the needle two times, then insert the needle back near the starting point, holding the thread taut as you pull the needle through. Practice makes this one reliable; keep tension steady and avoid pulling the knot through the fabric by gently guiding it down.
Lazy Daisy Stitch
Also called a detached chain stitch, the lazy daisy forms a single loop anchored by a small stitch at the end. Arrange five or six around a French knot for an instant flower. Bring the needle up, re-enter at the same spot, make a loop, bring the needle out at the loop’s tip, and anchor it with a tiny stitch over the loop.
Fly Stitch
The fly stitch is a Y-shaped, open-looped stitch. It is useful for leaves, small decorative marks, and scattered texture. Bring the needle up on the left, insert it to the right at the same height, and bring it out below and between the two points, with the thread looped under the needle. Pull gently and anchor the loop with a small vertical stitch.
Couching
Couching secures a thick thread, cord or ribbon on the surface of the fabric with small stitches made by a thinner thread. It is helpful when a thread is too thick to pass through the fabric itself. Lay the thick thread along your design line and use tiny, evenly spaced stitches over it to hold it in place.
Feather Stitch
The feather stitch makes a delicate branching line, wonderful for crazy quilt seams, botanical designs and decorative borders. Work down a vertical line, alternating stitches to the left and right, each forming a loop of thread held by the needle as you pull it through. The result looks like a fern or feather.
Cross-Stitch
Cross-stitch forms small X shapes on evenly woven fabric such as Aida cloth. Work each stitch in two steps, a diagonal in one direction and a diagonal in the other, making sure the top stitches always cross in the same direction for a neat finish. Use a chart to follow patterns. Cross-stitch has devoted fans because it turns counting and color-following into a calming, meditative craft.
Common Machine Sewing Stitches Worth Knowing
Although this guide focuses on hand work, many of the same ideas carry over to the sewing machine, and most beginners eventually own one. Understanding machine sewing stitches also helps you decide when hand stitching is the better tool.
- Straight stitch: the standard seam stitch. Set the length to about 2.5 mm for most woven fabrics, shorter for lightweight materials and longer for thick ones.
- Zigzag stitch: a side-to-side stitch that finishes raw edges, sews stretch fabrics and creates decorative effects. A narrow, short zigzag is a quick way to stop fraying.
- Stretch stitch: a stitch designed to flex, such as a lightning-bolt stitch, so seams on knit fabrics do not snap when pulled.
- Basting stitch: the longest straight stitch on the machine, used for temporary holds and gathering.
- Topstitch: a slightly longer straight stitch, often with heavier thread, sewn on the right side of the garment for a crisp, decorative line along collars, pockets and hems.
- Buttonhole stitch: a dense, programmed series of stitches that creates a reinforced opening for a button.
- Blind hem stitch: a machine version of the hand blind hem, with a few straight stitches followed by a small zigzag that catches the fold.
Hand sewing is still the better choice for small repairs, sewing on buttons, delicate fabrics, finishing touches, and any place a machine cannot reach. Many experienced sewists use both, moving between machine and needle as the project demands.
Stitch Length, Tension and Thread Control
Getting the technique right matters as much as choosing the right stitch. Three factors determine how professional your work looks.
Stitch Length
For hand sewing, aim for stitches about 1/8 inch long on seams that need strength, and longer on temporary work. Consistent length is more important than tiny length. A seam with slightly longer, even stitches looks far better than a seam where the stitches wander between tiny and huge.
Tension
Thread tension in hand sewing is the pressure you apply when pulling the thread through. Pull until the stitch lies flat against the fabric, then stop. If the fabric puckers, you have pulled too hard. If you can see loops or gaps, you have been too loose. A good habit is to let the fabric lie naturally between stitches so you can see how it behaves before pulling the next stitch.
Managing Tangles
Thread twists as you sew, especially with long lengths. Every few stitches, let the needle dangle and spin freely so the thread untwists. Running thread through beeswax before use reduces tangling and knots. If a knot forms, do not yank it; use the tip of a pin to loosen it gently.
Common Mistakes When Learning Types of Stich
Everyone makes mistakes when learning. Knowing the usual culprits will help you avoid them or fix them quickly.
- Using thread that is too long. Anything beyond about 18 to 20 inches tends to tangle and fray. Use shorter lengths and re-thread more often.
- Pulling stitches too tight. This is the number one cause of puckered seams and distorted embroidery. Aim for stitches that lie flat without strain.
- Skipping the finishing knot or backstitches. Seams without secure ends come undone. Always lock your stitches.
- Choosing the wrong needle. A needle too thick leaves holes, while one too thin may bend or break. Match the needle to both thread and fabric.
- Working without a hoop in embroidery. Loose fabric leads to uneven tension and warped designs. A hoop keeps surfaces taut and smooth.
- Ignoring grain and stretch. Sewing against the fabric’s grain or pulling stretchy fabric while sewing creates ripples. Let the fabric feed naturally.
- Rushing. Hand sewing rewards a steady rhythm. Slow down for curves, corners and decorative work.
Quick Fixes
If a seam is wavy, remove the stitches and re-sew with lighter tension. If embroidery thread frays, shorten it and try a larger needle eye. If your knots keep slipping through the fabric, use a slightly bigger knot or secure the thread with two small stitches instead. If your stitches keep varying in size, mark a guide line with chalk or a washable pen and use the same distance between needle entries each time.
A Simple Practice Plan for Basic Stich for Beginners
Skill comes from repetition, not talent. Here is a four-week plan that takes you from your first stitch to confident, practical sewing, using only basic stitches for beginners and a few scraps of fabric.
Week 1: Control and Consistency
Spend each session sewing straight lines of running stitch on a piece of plain cotton. Draw guide lines with a pencil and aim for even stitch length. Practice starting and finishing the thread securely. Finish the week by sewing a drawstring pouch from two rectangles of fabric using running stitch and a whipstitched top hem.
Week 2: Strength and Repair
Learn the backstitch and use it to repair a seam in an old garment or sew two scraps together. Then practice sewing on a four-hole button, a task you will use for life. Finish the week by fixing a torn pocket or a hem that has come loose.
Week 3: Invisible Finishes
Learn the slip stitch and the ladder stitch. Make a small stuffed shape from felt or fabric and close the opening so the seam disappears. Try a blind hem on a scrap of trouser fabric so that you understand how it feels to catch only a thread or two.
Week 4: Decoration
Pick a few embroidery stitches, such as stem stitch, satin stitch, French knots and lazy daisy, and stitch a small floral sampler in a hoop. Add a blanket stitch border to a felt coaster or ornament. At the end of the month you will have a collection of finished items and, more importantly, the muscle memory to tackle larger projects.
Caring for Stitched Work
Good stitching lasts longer with care. Wash handmade items gently, preferably by hand or on a delicate cycle, especially if they include embroidery. Wash embroidered pieces inside out and press them from the back on a padded surface, so the stitches are not flattened. Check seams occasionally for loose threads and re-secure them early, since a small repair now prevents a bigger one later. Store thread away from direct sunlight, which weakens and fades fibers.
Frequently Asked Questions About Types of Stich
What are the most important types of stich for a beginner?
Start with the running stitch, backstitch, slip stitch and whipstitch. Together they cover most repairs, seams and finishes. After that, add the blanket stitch and a few basic embroidery stitches such as the straight stitch, stem stitch and French knot.
What is the strongest hand sewing stich?
The backstitch is generally considered the strongest of the common hand sewing stitches, because each stitch overlaps the one before it and forms a continuous line, much like a machine seam. A double thread or heavier thread adds extra durability.
How do I make my stitches look even?
Mark a guide line, use a consistent needle size, and measure your first few stitches against a ruler until your eye learns the distance. Keep your tension steady and avoid pulling the thread too tight. Practice on scrap fabric before starting your project.
What is the difference between sewing and embroidery stitches?
Sewing stitches mainly join, hem or finish fabric, so they emphasize strength and neatness. Embroidery stitches mainly decorate fabric, so they emphasize texture, color and pattern. Some stitches, including the backstitch and blanket stitch, are used in both.
How long should my thread be when I sew by hand?
About 18 inches, or roughly the distance from your fingertips to your elbow, is a good length. Longer thread is more likely to tangle and weaken as it travels through the fabric.
How do I learn how to sew a stich without a teacher?
Begin with one stitch at a time, practicing on scrap fabric with contrasting thread. Follow written steps or video demonstrations, compare your work to clear photographs, and repeat each stitch until it feels natural. Short, regular practice sessions work better than occasional long ones.
Can I use embroidery stitches for mending?
Yes. Decorative mending, sometimes called visible mending, uses embroidery stitches such as running stitch, satin stitch and darning patterns to repair holes and worn areas while adding character. It is an excellent way to extend the life of clothing.
Is “stich” the same as “stitch”?
“Stitch” is the standard English spelling. “Stich” is a frequent typo, and in German it is a different word entirely, so if you are looking for sewing information, searching for “stitch” will give you more accurate results.
Conclusion: Choose, Practice, Enjoy
Learning the main types of stich gives you a toolkit you can use for a lifetime. The running stitch and backstitch handle most seams, the slip stitch and ladder stitch hide your work, the blanket stitch finishes edges, and a handful of embroidery stich options let you add color and personality to nearly anything. You do not need to master them all at once. Pick the basic stich for beginners first, practice until they feel relaxed and automatic, then add new ones as your projects demand.
Remember that every skilled sewist once struggled with tangled thread and uneven stitches. What matters is steady practice, patience and a willingness to unpick a seam and try again. Gather your needle, thread and a scrap of fabric, and make your first stitch today. In a few weeks, you will look back at how far you have come.
